

With the Night Carnival just a few days away, I still haven’t decided on my accessories for this year’s costume. As you’d expect of someone with my creativity and ingenuity, I play the shockingly-named Silver Wheel, a Spinner of yarns and Finder of ways home. (Look, I’m not going to apologize. I wanted an excuse to spin at the Carnival.) Last year, I wore my spinning wheel earrings and most of my Frigg costume (which is head-to-toe silver), but that’s a little on the nose. I’m looking for something a bit more fantastical and a bit more appropriate for the lore of the Night Carnival.
My first attempt at a not-a-literal-silver-wheel silver wheel is inspired by my mushroom work. The gills look like spokes without a hub, which is an idea that fits in rather nicely with the chaos and magic of the Floating City. Whether or not I wear these accessories for my costume on Saturday, I’m pleased with how they turned out, so they’ll be today’s tutorial.
Silver Spokes
Note — To make this set of earrings and pendant, I use a mushroom gill mold that I have already created. I covered mushroom gills in Make Room for Mushrooms last week. If you do not have a mold, you may follow my instructions for the back, gently flip over the piece, and lightly score the front in the same way. If you choose this method, watch for flattening that may occur on the back.

For this project you will need grey clay, silver mica powder, head pins (or wires), ear wires, a roller, a needle tool, two circular cutters, a gill texture mold, and a non-porous work surface.
Prepare
Choose and condition a grey clay that is darker than the silver mica powder that you intend to use. I also recommend an accent shade of mica powder. Prepare your wire lengths or head pins so that they are shorter than the earrings and pendant that you plan to make. Make a sideways bend at the bottom of each to help it to stick into the clay.
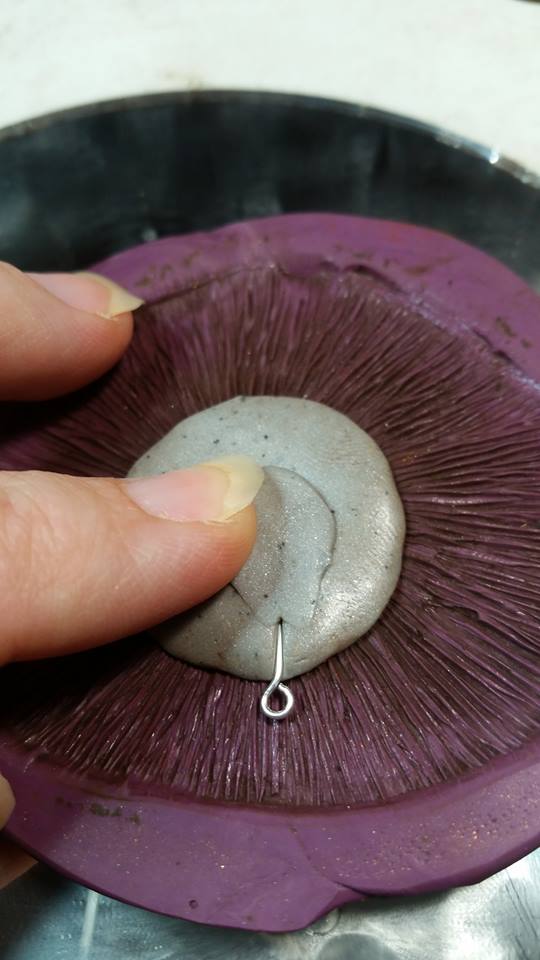
Portion I — Foundation
Roll out clay to about a 1/4” thickness
Using cutters, cut two circles for earrings and a larger circle for pendant
Place one circle of clay onto the center of the mold and press down firmly
Thin and round the edges by pressing down gently; continue until even
Firmly lay head pin in clay in a centered position, leaving just the loop sticking out
Press an additional bit of clay over the head pin and smooth to the edges
Taking care not to score deeply and expose the head pin, make radial marks with the tip of the needle tool
Drawing the needle tool lightly from the edge inward, continue subdividing the circle until no more lines can be drawn


Portion II — Shimmer
With a light touch, apply silver mica powder to all of the ridges that you just created
Gently remove clay from mold and turn over (this side will be the front)
Apply a generous amount of accent color to the center of the front and run it along some of the main “spokes” outward toward the edge
Apply silver mica powder to the outer portions and blend toward the center
Holding the clay very gently, turn it sideways and apply a generous portion of silver mica powder to the edge all the way around


Once you have done this to all three pieces, you can go ahead and bake according to the manufacturer’s specifications, but be sure to bake them with the front side up. There may be a small amount of flattening in the baking process, and we want to confine that to the backs. When your pieces cool, just add on the rest of your findings, and your set is complete.
